2-minute read
Quick summary: How to set up your Salesforce org to listen for webhooks
Setting up your Salesforce org to listen for webhooks should be easy. Actually, it is easy, but it seems the steps are buried in different places like Horcruxes. I’m going to assemble them here, and if He-Who-Must-Not-Be-Named shows up, he can proof-read this for me.
So, we start with a simple Apex class. There are a bunch of examples of this. The easiest one for a quick start is in the Salesforce blog post “Quick Tip – Public RESTful Web Services on Force.com Sites.” Remember, it is a quick demo. Your final code should look like something between that and the example from the Salesforce Apex Hours video “Salesforce Integration using Webhooks.” My example is:
@RestResource(urlMapping='/hookin')
global class MyWebHookListner {
    @HttpGet
    global static String doGet() {
        return 'I am hooked';}
}
Now, the tricky part is that the Quick Tip blog has instructions and a screen shot of “just need to add MyService to the Enabled Apex Classes in the Site’s Public Access Settings,” followed by a wonderful example of a sample URL. Because I used Sites and Domains customizations once for a Trailhead exercise six years ago, the connection did not immediately click for me, nor the other steps. I will save you the tedium of reading all that I went through, which included pausing the aforementioned video several times to capture the exact steps and summarize them for you here.
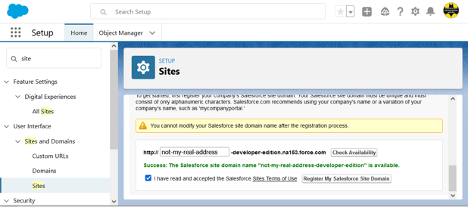
In Setup, search for “site” and select User Interface > Sites and Domains > Sites from the results. Create a site here if you don’t already have one (and if it is in production, make sure it is the URL you want).

If you created the domain just now, scroll down after clicking the Register My Salesforce Site Domain button and click the New button at the bottom. Fill in only the required fields (remember, this post title starts with “Quick and simple,” not “Safe and secure” … though you should do that on your own until I write that version), and Save (there may be a delay before the screen refreshes … be patient, as clicking it again will cause it to try to create another site and give you an error message). If you already had a site, click the site name in the list at the bottom of the page to get to Site Details page, specifically, the Public Access Settings button.
Here we want to find the Enabled Apex Class Access link and click it or the Edit button that pops up on hover:

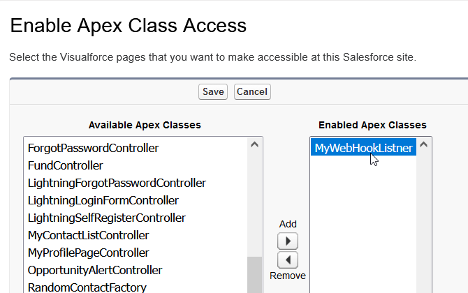
And finally we get to the screen shown in the Salesforce blog post that lets the magic happen:

Add your class, save, and you may need to navigate again to the bottom of the Sites page and click the Activate button to activate the site you have created.
Now, take the site URL and add services/apexrest/[urlmapping] (the value used in you Apex code for urlMapping=) and go there. (The full URL will look something like “https://my-developer-edition.na9.force.com/services/apexrest/myservice,” with the bold text matching your site address and urlMapping, respectively.)
If all went well, you should see what ever nifty response you set as a return string, at which point you can get rid of the return string and do the serious stuff you want to do with your webhook. If not, drop me a line describing exactly what happened and I’ll try to figure out which of us skipped a step.
Also, for that security stuff I had said I wouldn’t cover, I do have to recommend that you:
• Make sure that you handle all verbs and kill off the ones that aren’t expected.
• Check the referrer for matching where you accept requests from.
• Validate the format of the request matches what you expect.
Again, there may be more details in a future post. This one was just to make sure I didn’t have to go on another Horcrux quest.
To summarize all of above cheekiness into a set of steps:
1. Your webhook class will be a RestResource.
2. You must have an active Salesforce Site.
3. You need to enable your RestResource Apex Class under Public Access Settings for Salesforce Sites.
4. Your listener URL will be your Salesforce Site address/services/apexrest/urlMapping.
5. You should secure the heck out of the class and processes before letting it access anything beyond a simple response string.
Like what you see?

Senior Technical Architect Scott S. Nelson has over 20 years of experience consulting on robust and secure solutions in areas such as multi- and hybrid-cloud, system integrations, business process automation, human workflow management, and quality assurance innovation.

